
We'll I'm not really "making" soap, but I am saving money. I recently made a whole jug of refill soap for my empty foam pump from Bath and Body Works. I do love the foam pump soap from there, but even with it on sale it still costs more than what I did.
I just took an empty water jug (nice and clean of course) and filled it with a few bottles of Dial Antibacterial Hand Soap and some water. After emptying each 9.375 oz. bottle into the water jug I would then fill up the empty Dial bottle with water and pour it in also. I did this twice with each bottle of soap. So it's 1 part soap and 2 parts water. I think I paid around $0.55 for each bottle or they may even have been free. I've seen it go on sale at Publix for $1 a couple of times now. I'll be buying more when that happens again.
(The size of the bottle I used isn't important. I'm just telling you what I used. I can't remember if the water jug I used was able to fit three bottles of soap with water or 4, but I have great confidence that you can figure that one out yourself.)
You do have to buy an initial bottle of foam pump soap for the bottle and the nifty little mechanism that makes it foam up. I just waited until Bath and Body Works had a sale and while I used that soap it was a special treat. I love all the B&BW yummy scents, but I do like the White Tea & Vitamin E that I used from Dial. It's not too flowery for my husband and it doesn't leave an overpowering scent on your hands either. You may eventually have to replace your foam pump bottle with a new one. I'm interested to see how long it will hold out.
I'm keeping the jug of soap under the bathroom sink. The soap I used was clear so I used permanent marker to mark ALL OVER the bottle. My kids are old enough now that I don't have to worry about them drinking it, but if yours are young you might want to keep it up higher. (I wouldn't put it past my kids to have bubble-making experiments with it though).
Do you have any money saving tips to share?
Thursday, September 9, 2010
Thursday, May 6, 2010
I'm Back........I Think........I Hope!
Wow, it's been a whole month. What happened?
I'm glad you asked.
Turns out 12 year old daughters and computers don't always mix well.
First she picked up 26 or so viruses (even those kiddie sites can be hiding some wickedness). Once our wonderful computer genius friend waded through all of that mess and fixed it I squeezed in the April 6th post here and then the following happened...
*My Photoshop Elements ceased to work. Groan.
*Above mentioned daughter decided to use computer to download photos while parents were out on a date (after being grounded from the computer for the aforementioned viruses - Hey, she had been warned countless times not to click on anything that would take her off the site that we had approved of) and of course tried to access Photoshop Elements to do so.
*At this point in time the Operating System said, "NO MORE!!!" and crashed giving us what we would soon come to know as The Blue Screen of Death.
*Long-suffering, kind, computer genius is called again in desperate frustration. He makes 15 discs of info. on mother board then wipes the whole thing clean starting us up again with a totally clean slate. Now I have my lovely computer back like a fresh spankin' new baby (without the wonderful baby smell, but I'm not complaining).
Oh, did I mention that when the lovely daughter whom I decided not to ground for life, but close to it, tried to access Photoshop Elements she panicked and TOOK OUT HER MEMORY CARD WHILE THE CUTE LITTLE CAMERA SHAPED LIGHT WAS FLASHING ON THE PRINTER?
No? Well, she did (insert groan, sigh, weeping and gnashing of teeth here).
The manual that comes with the printer states at least half a dozen times that this will cause a large crater to form sucking up the perpetrator.
Oh, if only my daughter had been so lucky.
So, once my computer was back up and working I discovered my printer was no...longer...working.
At all.
That is why there are no photos on this post. Actually, what photo could I post even if I wanted to?
A photo of me crying?
A photo of my daughter crying?
A photo of my computer wizard friend crying?
Anyway, today I took the 191 dollar steps (can I weep again?) that it will take to replace my printer in 5 to 7 business days.
I hope anyone who reads this hasn't totally abandoned me. I really have missed my blog and those of you who have so kindly decided to follow me. I'm sorry I've had nothing for you to follow lately. I promise to come back with a vengeance once my shiny new printer gets here and I figure it out.
By the way, do you have any suggestions for jobs for my daughter could do to pay me back for the printer?
The more disgusting the better...
but it can't take place anywhere near the computer.
Tuesday, April 6, 2010
I've Missed My Little Blog
I haven't been able to get onto my computer since mid-week last week because of a HUGE computer mess that made it impossible. It has taken many days and an amazing computer wizard friend to get me back here.
I've missed you.
Really.
A lot.
I mean it.
I hope everyone had a wonderful Easter. Ours was awesome.
I LOVE our church!!! It has to be the most amazing place I have ever been. Being there on Easter in our new building was extra special.
I also love the family that I spent time with. Easter just wouldn't be the same without them.
I know that Easter was two days ago (almost three now), but I couldn't post this earlier because of the above mentioned problem.
I made this with items I bought from the Dollar Store when I was doing Lindsay's challenge.
(Okay, I just spent 3+ hours trying to figure out why my Photoshop Elements wasn't working to no avail. Aargh!!! Oh well, HP Photosmart to the rescue...)

Just a card, two frames and some green flowers from the Dollar Store.
I tried to find a card that would work well with my idea and this one was the best fit. I would have loved to have found an angel, an empty tomb and a cross or dove, but I didn't see any. I like the way this turned out though. I don't have many Easter decorations so it will be fun to get this one out each year.

I ended up switching frames from the ones in the previous photo after a failed attempt at something fancy.
Always learning something new even with failures.

It's hard to see, but I took out the glazing points that hold in the glass. I wouldn't need them later because I would be gluing the glass in. They are usually used to hold the back of the stand and the photo in the frame, but I wouldn't need them for that either. Oooooh, are you curious yet?

Next a good coat of primer because I was afraid the shiny fronts (you're actually seeing the backs in this photo) wouldn't take well to being painted with my acrylic paint without it.

On the left is one coat of Folk Art Vintage White and then two coats on the right. I ended up deciding on three. Some of the gray primer still shows through, but that was fine with me. It gave it a somewhat aged look.

Once I had the frames ready I moved on to the card. I attached the card to a comic book backing board with Golden's Regular (Matte) Gel Medium. I'm sure some sturdy cardboard would work, but I knew it would be visible, around the edges, in the next step so I went with something white.

Now, I probably should have waited until it was completely dry to start cutting it out, but I'm a bit impatient (just ask my husband...and my kids).
I broke a small part of the tip off of three X-acto knife cutting blades doing this.
I'm sure it was due to the thickness. This part took awhile and my hands got a little sore, but it was totally worth it.

Now for my favorite part...the leaves.
I used my green flowers to cut out leaf shapes. The bottom two on the left are what I was going for.

Then I strategically glued them to the tree.
I used Beacon's 3-in-1 Advanced Craft Glue for this part.

Now onto assembly.
I didn't take a photo of it, but I attached the glass back into both frames with Duncan's Liquid Fusion Clear Urethane Glue. Awesome stuff! A little of it squeezed onto the glass when I put it together, but once it was dry it came off the glass nicely with a razor blade.
I chose some ribbon I already had on hand and stapled it to the top backside of the first frame. (I'm thinking about decorating a whole wall with all the ribbon I have on hand. Maybe I could add my buttons too. Just kidding...maybe.) I also stapled the tree piece (facedown, toward the glass) because I wasn't sure glue would be enough to give it stability. You'll notice I stapled it to the backside of the frame also. Then I glued two of the larger small pieces to the frame against the glass.

Here's where it gets complicated.
I'm not very good at explaining things sometimes so I hope I make this clear.
On the second frame I glued the last two small pieces against the glass facing toward the back of the frame. You can see where I didn't paint the back of the frame completely. I knew it wouldn't be visible when I sandwiched the two frames together so I didn't waste my time on it.
Sorry, no photo for this oh, so very important part. I used Dries White Gorilla Glue to attach the two frames back to back making the finished frame SEE THROUGH!! Yes, I'm feeling terribly clever. Please don't tell me that you've seen this done a million times before. Let me revel in my delusions of grandeur for just a bit.
Ahhh, that feels good.

Here it is hung in my kitchen window.
I just love the 3 dimensional effect of the whole thing.

A little close-up.

And a bonus silhouette view.
Don't the leaves look so pretty?!
It's so sad that I've already put it away and you are just seeing it for the first time.
I'll have to get something new on here real soon that isn't already outdated.
I'm just glad I can get back on my computer again.
Happy happy blog blog.
Monday, March 29, 2010
One of My Greatest Masterpieces
In honor of one of my greatest masterpieces, created 6 years ago today, I will not be posting crafty goodness because no craft I could create could be better than this:
March 2004

Oh my...I had forgotten how amazingly wonderful he looked as an newborn.
If I could only go back in time for a few minutes just to smell him.
March 2010

Here he is today. My Little Man. He's still awfully adorable. So snuggly and as funny as can be. Happy Birthday sweetness. I thank God for giving me the opportunity to be your Mommy and to experience life togther with you. You are a magnificent blessing.
_________________________________________
I promise to post a little something I made in the next couple of days. I came up with several other Dollar Store crafts while I was working on Lindsay's challenge. I'm particularly excited about this one that I have to share next. Oh, who am I kidding?! I'm excited about the one after it too.
Have a blessed day. I'm off to make cake.
Thursday, March 25, 2010
Spring Candle Centerpiece
Well, it's time to show what I made for Living with Lindsay's 2nd Annual $5 Dollar Challenge. I was really excited about this when I first heard about it and I was anxious to get to the dollar store and get started. However, once I got there my brain just couldn't think of anything I wanted to make. 'Wanted to make' being the necessary component because whatever I made I wanted to like and keep it. Two more trips to the Dollar Tree and the same problem kept occuring. Finally some acceptable ideas started to germinate and this is what I came up with.
First I bougt a glass bowl and candles in the candle section, some curly ribbon in the giftwrap section and some cards in the...yep, you guessed it, the card section. So all-in-all this project ended up costing only $4.

First I measured everything because I needed to know how big to cut my cards so they would fit and still have space in between each one to let more light shine through.


Buying these in a package of four made this project possible. Otherwise I would have gone over budget if I had had to buy them separately.

Then I cut out the card portions that I wanted.


Then I measured the center point on each side, marked it and punched holes. I used the first one I completed as a template for the others.


Next I cut out the center of the heart with an Xacto knife. I use a glass cutting board because it seems to make the blade cut more smoothly.

Originally I had planned to only cut out the heart, but then I decided it needed a little more so I cut out parts of the top.

Now I was thinking it looked pretty good, but wait. What about the wings?

Love it, love it, love it!
Now that my hands and fingers were worn out from cutting all that out, it was time for tying it all together. I had measured earlier so I knew about how far apart each piece needed to be. In the end I only had to do a little finessing to get the spacing just right.
I used this crazy curly ribbon that I wasn't sure would work out, but I think it fits the final product perfectly.

(I took this photo after I had already cut off my four pieces.)
I just tied a regular bow and let the curls do their thing.

I tied them all together in a row.

Then I tied them onto the bowl.

Then I added candles (I ended up using tea lights) and lit them.
Here's the daytime photo:

(Oooh, I love how the light peeks behind the wings.)

And now my favorite...night time:


Oooh...Aaah...
Seeing the finished product makes me wish I had put it on a little pedestal candle holder and glued them together for added height. Perhaps I will do that later. I also might add a little glitter to the flowers on the wreath. We'll see.
I think this fits well for Spring, but it would also do well for a wedding.
From start to finish it took me about 1 1/2 hours to make. Of course I was figuring everything out and taking photos with my left hand (incredibly difficult) so I'm sure it could be done in less time.
It was fun. Thanks Lindsay. I'll be looking forward to next year.
Also, in all that time of thinking about what to do, between trips to the Dollar Tree, I came up with three other ideas that I'm going to be working on. If you liked this one, maybe you'll check back later to see what they are.
Monday, March 22, 2010
Something Practical
Today's Just Make Something Monday #10


This...

Was necessitated by THIS:

I can only imagine what it must have looked like from the outside of the house. (My poor neighbors!)
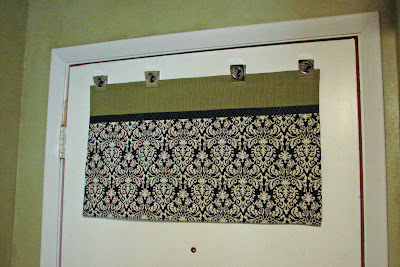
Our home only has six windows. Yeah, six. So, we decided to cut this nice little window in our front door several years ago to give us some more natural light.

This is what I see each morning. Nice.

This is more like the light we see in the late afternoon when we sometimes watch TV.
Not so nice.
The sun either shines right in our eyes as we sit on the sofa or it shines on the TV screen making it difficult to see clearly.
This is where the flannel pajama pants came in. They were a fix by lovely husband.
I knew I had wanted to make a curtain for this area for some time, but the PJ's gave me a huge push to get it done. I must say that I am very pleased with the results.

I found the fabric when I was in Jacksonville with my Mom. It was perfect. You see, I had originally found the clips (they're magnetic since my door is metal) at Walmart and they had almost the same pattern as the bottom fabric.

Here is a close-up. So pretty and yet modern looking.
If you look closely at the PJ photo you can see a little red gingerbread man shaped clip at the top left of the pants. We used to have two of these that we used to hang a kitchen towel over the window. A quick fix that was just a step or two above the pants. I think you will have to agree that this new curtain beats our previous solutions.

The ribbon separating the two fabrics was my most difficult decision. I had wanted to add some red to it with some flowered ribbon, but I decided to play it safe. I think I may make a small bag out of the fabic I have left over. Maybe I'll add the flowered ribbon there.
In an added bit of irony, I also added a flannel liner between the layers to totally block out the sun.
I guess the flannel pants made a permanent mark after all.
The final effect is more like a giant placemat than a curtain, but it works.
I used the same technique I used in this bag I made to adhere the flannel. It worked wonderfully well. It's fun how the things you learn doing one thing get used making others.
________________________________________________________
I'm planning to start posting more often. We'll see how that works. Tomorrow...or maybe the next day...the answers I got concerning my post on March 15th. Yep, looks like there aren't any....or are there?
Wednesday, March 17, 2010
For My Stationery Swap Partner
Don't look Kattrina! At least not until you receive your package.
I had a lot of fun making up a package of goodies to send to my stationery swap partner Kattrina.
I hope I didn't go overboard. It was so hard knowing where to stop. Our limit was $15 and I really didn't spend even that much, but I'm sure it's enough for what I sent.
Here's the goods:

These are all cards I made. Three I made especially for Kattrina. One of them says "Hola" because I know she is marrying a young man whose native language is Spanish. I figure she can send this one to one of her new family members in the future. Most are my own ideas, but a couple of them I got from Kristina Werner's blog and one I made with a friend who is a Stampin' Up! demonstrator.

The top two cards on the left I purchased in a group at a school auction. They were made by a talented woman here where I live. She takes lovely photos. The top card on the right was made by my sister-in-law. Hand drawn and embossed. She made a large set of these for me and I think they are beautiful.
The bottom two rows look like photos, but they are actually envelopes. I made them with a pretty calendar that I purchased at the beginning of March when it was way cheap inexpensive. I made more from the rest of the calendar, but I gave Kattrina the best ones. ;)

These are some things I added just in case Kattrina's crafty. Just some bits and pieces of things I've collected or have been given. The labels on the bottom left I made so she could use them on the envelopes I made in the previous photo. I hate the thought of having to cover up any of the beautiful images of nature, but you can't send a card without an address, right!?
The colorful circles I bought on Etsy. I adore Etsy! Much time has been lost in my perusing of Etsy.

These are some cards and postcards I've had hanging around for awhile. I still like them very much, but someone else should enjoy them too. The two postcards in the top right hand corner are from our local museum in Sarasota. I actually bought a print and had it framed of the second one from the right. It's called Roman Courtship. I just love it. In the museum it's enormous. It's beautifully painted. Oh, to have such an amazing talent.

Last, but not least, two pretty pens. I should have included them with another grouping, but I forgot and they so wanted their time in the spotlight.
I can't wait for her to get everything. I hope it all pleases her. I do tend to be kinda flowery in the things I like. I don't know if that is very trendy, but it sure is pretty.
If you're interested, my previous post poses a question for those with a crafty nature. I would appreciate any comments you might have.
Ciao
Subscribe to:
Posts (Atom)

