Just Make Something Monday #3

I’ve wanted to do this technique for a while now. I saw it when I was at a local scrap-booking store in St. Pete. They were doing it right before Christmas a couple of years ago. I went back later and got the directions and now I’m going to share them here.
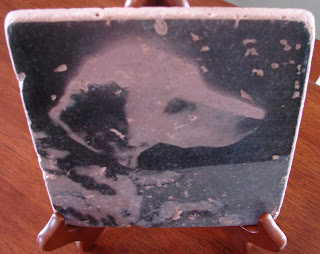
Overall I really like the way it turned out. My sister-in-law will love it. This is her dog Lady. She passed away and this is the last photo my SIL took. The glow on her head makes her look so angelic. The photo was taken using her cell phone. She’s had difficulty getting a good copy of it so I think this will just make her so happy.
How To:
You’ll need:
· Tumbled travertine tile. - I purchased mine at Home Depot. You can get them in either 4”x4” or 6”x6”. This one is 6”x6”. Find tiles that are as smooth as possible since you will lose pieces of your image in the finishing stages wherever there is pitting. This tile would have been a loss if a pit had ended up in the middle of the eye.
· A copy of your photo cropped to the appropriate size on regular copy paper. - Rounding your corners is advised. **Image must be copied by a laser printer. **If you have access to a program that will flip your photo before you get your copy made you will want to do this because your image will come out as a mirror image if you don’t.
· Golden Regular Gel Medium (Matte)
· Golden Regular Gel Medium (Gloss) – You could probably use the Matte for the top coat if you don’t want a glossy finish
· Brayer
Now to get to it:
· I didn’t bother cleaning my tile, but I suppose it couldn’t hurt to give it a good wipe to dust it off.
· Apply Matte Medium to tile. I used a foam brush, but I don’t think it matters what kind of brush you use. Just make sure the coat stays wet until you adhere your photo.
· Invert and adhere (Photo should be face down on the tile) photo to tile using a brayer to lightly go over the back of it. Don’t go crazy. You don’t want any smearing if you smoosh or wiggle.
· Let dry for 4 hours. OR Bake in oven for 15 minutes at 150 degrees. I couldn’t get my oven to stay that low so I just opted to let it dry overnight since it was too late to finish it after 4 hours.
· Once it has dried (or baked) wet the top of the tile where the photo is until it is translucent. Gently rub paper off until you have removed as much as possible leaving the photo behind. Here’s where it gets scary. Especially when the photo areas over the pits start to come off. I let mine dry for a while in front of a fan and decided to wet it again to get more of the paper pulp off. It kept drying whitish. Eventually I got too worried that if I rubbed off any more I’d lose important parts of the photo so I went ahead and moved on to the next step hoping for the best.
· After it is dry apply the Gloss Medium. I used a nice soft brush for this part. I didn’t thin it, but I would advise thinning it a bit so you don’t see the brush strokes as much as mine shows. That’s something I’ll have to do next time. It actually dried much clearer with the medium on it. Nice and translucent. I think I may apply another coat in the opposite direction, thinning this time, and see if it helps with the lines from the brush.
· Let dry. Mine still shows a little bit of whiteness from where I wasn’t aggressive enough, but I’d rather have it that way than to have lost any more of the photo.
Here’s another view so you can see more of the texture of the tile and the thickness.

Have Fun!


No comments:
Post a Comment