Monday, January 25, 2010

Heart Pillow (JMSM #4)


Just Make Something Monday #4


I love hearts. I always have. It just can't be helped.

This is the perfect time of year to indulge myself in making them. After finishing this one I could easily envision a heart for each month, so don't be surprised if they show up on here. The very special thing about this one is that it uses the fabric from a red-checked shirt that both of my boys wore and that they looked so adorable in. I just couldn't part with it. I only had to use a small piece to make this heart so I have a lot left to make several more. I know I won't be using seed beads this time as an embellishment. They weren't terribly easy to use. I had to put them on one...bead...at...a...time. Ugh! I had also mentioned some difficulty I was having getting the heart nicely rounded, but in spite of the challenges I think it turned out very well. I also really like the swiss dot (?) fabric I used for the top. This is actually from a blouse I bought at Goodwill. The ribbon is velvet and the mother-of-pearl buckle is from a favorite local shop, Retro Rosie . I had wanted to use a rhinestone buckle, but alas, I did not have one the right size.

We did several fun things this past week. Since I homeschool I like to do some fun things with my kids that are of an educational nature. This week we made butter and a volcano (not to be used together).
I remember sitting on the kitchen countertop as a little girl and making butter with my Mom. I also remember salting it do death when she left the room. I wanted to relive that memory without the excessive sodium overload. It was super easy. I felt like Laura Ingalls. Actually, I felt like Melissa Gilbert who played Laura Ingalls on the Little House on the Prairie television show because I got to enjoy indoor plumbing, air conditioning and store bought heavy cream while making it. Now this was supposed to be a fun project for the kids and myself; however, after a couple of shakes of the jar of cream the little ones ran off to find more exciting things to do. It tastes good, but once you refrigerate it it is just like regular butter in that it gets totally unspreadable. Makes me want one of those nifty Butter Bell Crocks I've read about before. Maybe one day.
>

The volcano was made possible by a sweet aunt and uncle this past Christmas. They also homeschool and knew we'd appreciate the gift. Plus what boy wouldn't love making his own lava? And doesn't my little man look too cute in the goggles?


Monday, January 18, 2010

Photo Transfer onto Tumbled Travertine Tile


Just Make Something Monday #3


I’ve wanted to do this technique for a while now. I saw it when I was at a local scrap-booking store in St. Pete. They were doing it right before Christmas a couple of years ago. I went back later and got the directions and now I’m going to share them here.

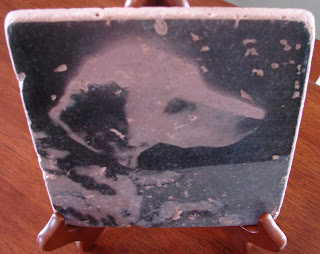
Overall I really like the way it turned out. My sister-in-law will love it. This is her dog Lady. She passed away and this is the last photo my SIL took. The glow on her head makes her look so angelic. The photo was taken using her cell phone. She’s had difficulty getting a good copy of it so I think this will just make her so happy.

How To:

You’ll need:
· Tumbled travertine tile. - I purchased mine at Home Depot. You can get them in either 4”x4” or 6”x6”. This one is 6”x6”. Find tiles that are as smooth as possible since you will lose pieces of your image in the finishing stages wherever there is pitting. This tile would have been a loss if a pit had ended up in the middle of the eye.
· A copy of your photo cropped to the appropriate size on regular copy paper. - Rounding your corners is advised. **Image must be copied by a laser printer. **If you have access to a program that will flip your photo before you get your copy made you will want to do this because your image will come out as a mirror image if you don’t.
· Golden Regular Gel Medium (Matte)
· Golden Regular Gel Medium (Gloss) – You could probably use the Matte for the top coat if you don’t want a glossy finish
· Brayer

Now to get to it:

· I didn’t bother cleaning my tile, but I suppose it couldn’t hurt to give it a good wipe to dust it off.
· Apply Matte Medium to tile. I used a foam brush, but I don’t think it matters what kind of brush you use. Just make sure the coat stays wet until you adhere your photo.
· Invert and adhere (Photo should be face down on the tile) photo to tile using a brayer to lightly go over the back of it. Don’t go crazy. You don’t want any smearing if you smoosh or wiggle.
· Let dry for 4 hours. OR Bake in oven for 15 minutes at 150 degrees. I couldn’t get my oven to stay that low so I just opted to let it dry overnight since it was too late to finish it after 4 hours.
· Once it has dried (or baked) wet the top of the tile where the photo is until it is translucent. Gently rub paper off until you have removed as much as possible leaving the photo behind. Here’s where it gets scary. Especially when the photo areas over the pits start to come off. I let mine dry for a while in front of a fan and decided to wet it again to get more of the paper pulp off. It kept drying whitish. Eventually I got too worried that if I rubbed off any more I’d lose important parts of the photo so I went ahead and moved on to the next step hoping for the best.
· After it is dry apply the Gloss Medium. I used a nice soft brush for this part. I didn’t thin it, but I would advise thinning it a bit so you don’t see the brush strokes as much as mine shows. That’s something I’ll have to do next time. It actually dried much clearer with the medium on it. Nice and translucent. I think I may apply another coat in the opposite direction, thinning this time, and see if it helps with the lines from the brush.
· Let dry. Mine still shows a little bit of whiteness from where I wasn’t aggressive enough, but I’d rather have it that way than to have lost any more of the photo.

Here’s another view so you can see more of the texture of the tile and the thickness.


Have Fun!

Saturday, January 16, 2010

Making Memories and Heart Pillows

It worked! I finished my Just Make Something Monday project so it is all ready to post in a couple of days (and ready to give to my sister-in-law).

Right now I'm just hanging out with my boys while Dad and big sis are at Winter Jam. I would have loved to have gone with them. They'll be seeing Third Day, Newsboys, New Song, Tenth Avenue North, Fireflight and more. Maybe the three of us will go next year. Someone had to stay with the little monkeys this year though and seeing as how I'm so good at monkey-wrangling I was the natural choice. Actually, my husband is passionate about music (and he's an awesome monkey-wrangler too). It truly feeds his soul and right now we both know he needs that. It's also a great time for a 12 year old girl and her Dad to bond over a common interest. I'll be looking forward to hearing EVERY detail from her when she gets home. Memories. Gotta love 'em.

If I get time later I am going to keep working on some mini heart pillows I'm trying to figure out. I just can't seem to get the tops as round as I would like. The picture in my head is just dying to come out. Any suggestions?

Monday, January 11, 2010

Just Make Something Monday #2


I'm going to quickly get this photo on here before the clock strikes midnight.

Apparently, making one thing a week isn't as easy as one might think.
At least not one who home schools or one whose husband is going through some major work stress. Not one who downloaded 2,700+ pictures earlier in the week and whose computer is threatening a blow-up if I don't do something about the overuse of space. Not one whose original plan just didn't work out...yet. And so much more. Oh...so...much...more.

Just to keep myself up to date I wanted to make sure I made something, even if it is a bit lame. I loved my high school art class, but I wasn't the best and being the firstborn perfectionist that I am I let it get to me and I stopped drawing. (Rose was the best and I sure hope she has done something with her "better-than-me" talent or all my inner angst has been for naught). I haven't drawn anything in forever. So, with limited time I decided to give it a go. Really it's just a glorified sketch. I think it is a sketch with a lot of potential though. I'd really like to do it as a mixed-media collage. It won't be my next JMSM (Just Make Something Monday) project though. I hope to get my original plan back in motion and use that instead. However, if the collage house works out fabulously it will be in the mix soon.

By the way... I won't be blogging about food for awhile. It's for my own protection really. Our church just started a 3 week fast and my husband and I are on board with only eating vegetables and fruits, with no additives except seasoning and I don't mean with butter. We know it will be worth it, but in the meantime I'm staying away from the Pioneer Woman's food tab on her blog. Today I saw Potatoes Au Gratin and about fainted.
Okay, I'm actually three, four minutes late getting this post in, but I know...I hope you'll forgive me. Alright, now it's five minutes.

Tuesday, January 5, 2010

My Favorite Meal


So, last night we had my very favorite meal. I don't know what I would do if I ever lost the recipe. Actually, I've made it so many times I don't think I could forget how to make it. I love it's history too.

Once upon a time there was a young newlywed who was having her in-laws over for dinner for the first time. Having not had a lot of cooking experience that didn't involve cans or boxes as the main portion of the meal, she was uncertain as to what she should do. Never fear. Two precious angels, married, but not so newly, shared a time-tested recipe of their own after hearing about the newlywed's plight. So while the young wife rang up their purchases at the small retail clothing store, the angels wrote down the directions. Later joy rang out in the small apartment dining room where the food was blessed and delight shone from the faces of all present. It was a meal that made the young girl feel like a woman. It was a right-of-passage that would give her a desire to continue to find other meals that would warm the stomachs and feed the memories of her family for many years to come.

This is seriously good. I can't imagine anyone not liking it, but if you don't please refrain from telling me so so I can continue to live in my fairytale food world.
But just look at it. Doesn't it make you hungry?


Blessed Pot Roast

2 1/2 lbs. Beef Round Eye Round Roast - A bigger roast is fine if your crock pot has room.
2 cans french onion soup
2 or 3 T. Worchestershire Sauce
2 or 3 t. Beef bouillon
Garlic powder to taste
Salt & Pepper to taste
Potatoes and Carrots, peeled and cut into large bite-sized chunks - As many a you want and you'll want a lot. They are my favorite part.

Put roast in crock pot with the layer of fat on top. Add soup, Worchestershire, bouillon, garlic powder, salt and pepper. Put in potatoes and carrots. Add enough water to just barely cover everything. Cook in crock pot on low overnight or at least 8 hours.

To serve put meat on a separate platter and cut into 1/2 inch slabs against the grain. I like to have my roast with rice so I always make enough to put a couple of heaping tablespoon-fulls in the bottom of each bowl. On top of rice add potatoes, carrots and meat broken up into bite-sized pieces. Top everything with juice from the pot. So yummy you're almost guaranteed to eat too much. The vegetables are so tender and delicious I could eat them all by themselves. Yum!

Monday, January 4, 2010

Just Make Something Monday and Food

My first Just Make Something Monday. Yay!!!


I love how my sons birthday card turned out. I actually saw something like this at my, somewhat, local scrapbook store and memorized the gist of it to sketch when I got back to the car. They probably would have let me take a photo, but I wanted it to have more of me to it.


The Shrimp & Corn Chowder last night was a success! Amazingly enough everyone loved it. That's pretty impressive for my bunch. Thank you Dodie! It was super easy to make. We'll definitely be making it again soon.

Ze Recipe:

Shrimp & Corn Chowder

2 (10 3/4 oz.) cans cream of potato soup
1 1/2 cans milk (use soup can for measuring)

1 (3 oz.) cream cheese
1 (8 oz.) can canned corn, drained
2 c. frozen shrimp
1/8 tsp. cayenne pepper

1/4 c. scallions
1 clove garlic


Cook cayenne, scallions and garlic in butter, until tender. Add soup, milk, cream cheese, canned corn and shrimp. Bring to a boil, reduce heat, continue cooking on simmer for 10 minutes. Serves 4 to 6.

Delicious and delicious. Super easy too.


Tonight we had my most favorite Crock Pot Pot Roast. So yummy! I've been making this one for a long time. Pictures and recipe tomorrow.

Oh my goodness! It has taken me forever to figure out how to get these photos in here.
Time for nite-nite.


Sunday, January 3, 2010

Happy New Year - Almost

Well, the new year has begun, but at our house it doesn't really feel like it until school starts back and my hub goes back to work. So we're still being lazy and enjoying one of the few cold times that we'll experience here in Florida each year. Tomorrow I'll be making a nice Shrimp and Corn Chowder from my lovely friend Dodie. Then in the evening I'm going to get my favorite pot roast started in my new crock pot from my in-laws (XOXO). We'll eat that Monday. It'll be the perfect end to our first day back on a schedule.

I'm not making any resolutions this year. It's too disappointing when I get further into the year and realize I've totally forgotten about them. I am planning to do something crafty every week though. I love to make things and I just don't make the time to so I'm going to start my Just Make Something Mondays. I'll work on something either throughout the week on I might just throw something together on Monday if I run out of time, but I'll still make something. I'll post it on Monday to keep myself accountable. I'm already busy, for me, but I really want to do this. It's a part of myself that I've been neglecting for too long. Of course, this means that I need to get the 2,796 photos off of my camera. Yeah, 2,796! A whole years worth. Crazy!